
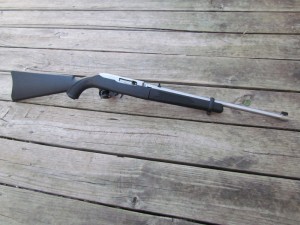
The Ruger Takedown 10/22 as it comes from the factory.
My project to convert the Ruger Takedown 10/22 into the perfect trail rifle is nearly complete.
Recently I wrote about the AGP folding stock when I replaced the factory fixed stock. The next upgrade was the addition of the Amega Mini-Scout-Mount. This new rail from Amega allows a scout-style or handgun scope to be added to the rifle. Because of the configuration of the Takedown 10/22 I feel that the platform lends itself to a barrel-mounted aiming device. Ruger apparently agrees, albeit only partially.
The factory iron sights on the rifle are both mounted on the barrel. Ruger included a scope base that is able to be bolted to the receiver, but I have my doubts about the ability of a receiver-mounted optic to be able to hold zero.
When I spoke with Douglas Green about his new product, they had just finished development in response to Ruger’s release of the new Takedown model of the 10/22. Amega already had a scope mount for the standard 10/22 carbine, but the Takedown 10/22 requires a bit more clearance for the barrel and forend to rotate properly and lock into place. Douglas told me that the rail wasn’t quite ready yet and that I would have to wait a week or two longer for it to be delivered.
True to his word, the brand new replica orologi Mini-Scout-Mount rolled off the assembly line and made its way into my mailbox in just a couple of weeks. The product was packaged well, and included all necessary parts to complete the installation, as well as an Allen wrench for tightening down the screws in case you don’t already have one of the proper size. A set of instructions was also included, which I promptly discarded. Does anybody read those things anyway?
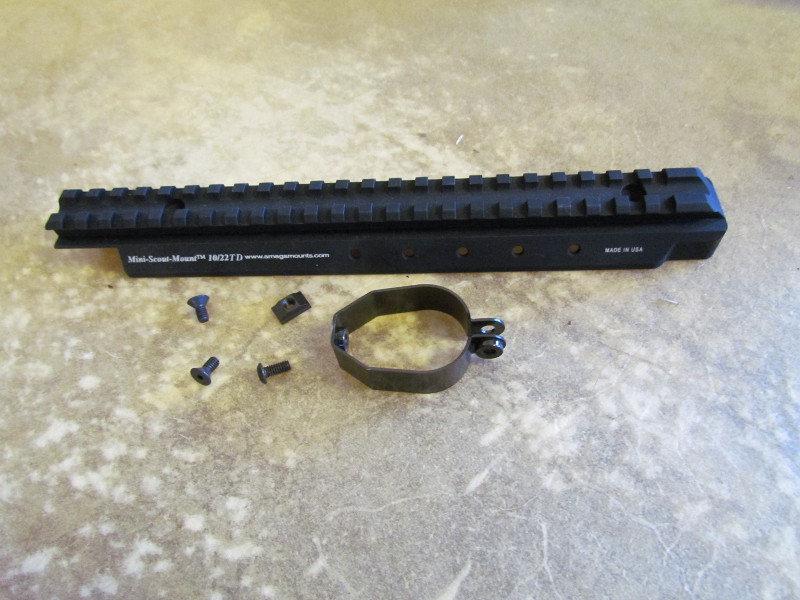
All parts necessary for the installation of the Amega rail are included with the kit.
Seriously though, with the handy step-by-step instruction manual (*.pdf) the installation of the Amega Mini-Scout-Mount is fairly straight forward. Start by using a brass punch to drive out the rear sight from its dovetail mount set into the barrel. Next unscrew and remove the front barrel band.
There are three screws included with the kit: one cap-head screw for the barrel band, one flat-head socket screw for the front of the mount, and another for the rear. The instructions help differentiate between the three.
Using the correct screw, install the barrel band provided by Amega. It should go without saying, but the open end goes on the bottom and the flat threaded part goes on top. This is where the front mounting screw will secure the rail. At this point do not tighten the barrel band in place using the cap-head screw.
I found that the rear dovetail screw mount fit loosely, sliding very easily in and out of the dovetail. A little bit of care is required to make sure that it remains perfectly centered when installing the rail. What I did was to set the dovetail mount in place and then, holding the rifle steady, gently position the scout rail on top and get the rear mounting screw started into the threads just enough so that there is a little bit of tension holding the dove tail in place.
The instructions place importance on not torquing down either screw until both are started. With the rear dovetail mount holding the rail in place the front barrel band mounting screw is easy to get started.
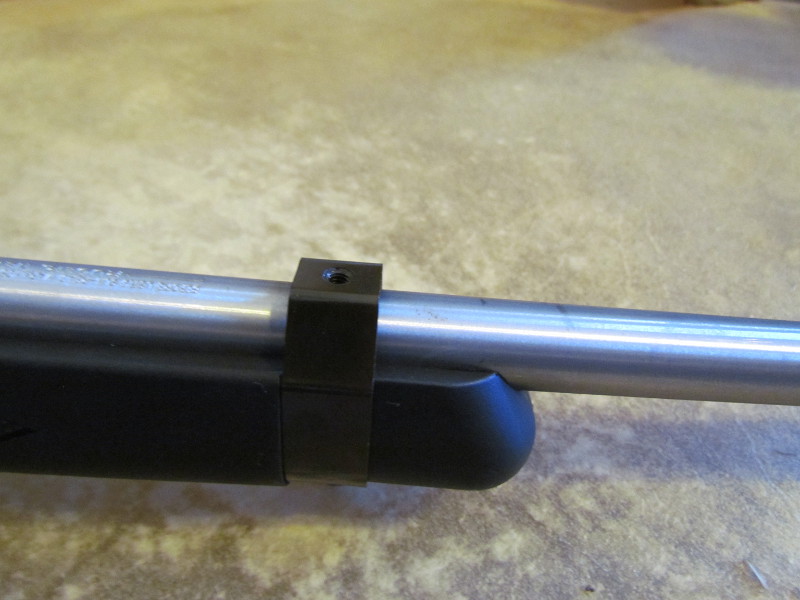
The new barrel band features a slightly raised flat top with a bolt welded in place to mount the front of the rail.
Now go ahead and tighten the front screw that secures the rail to the barrel band. Only once this is done should you tighten the cap-screw that holds the barrel band in place. Once both screws are partially threaded into place, check the alignment of the rail.
You’ll have to eyeball the alignment here, but focus on making sure that the rail is centered over the top of the barrel from left to right. Once the rail is centered over the barrel from left to right, go ahead and torque down the rear dovetail mount screw.
While centering the rail I discovered that, even without the rear sight, the channel running down the center of the rail can be used as a way to sight the rifle since the front sight remains in place throughout the installation. I’ve no idea where the point of impact is since I didn’t test the rifle in this way, but I suspect it is higher than it is using the factory rear sight.
It’s little things like this that I look for when installing a optics, especially electronic optics, on any firearm. In a pinch, if you had to ditch whatever it was you had mounted on the Mini-Scout-Mount, that central channel in the rail can provide a crude but effective rear sight and allow you to continue to use the rifle.

The dovetail mount fits loosely, so it should be installed last and the mounting screw not torqued until the rail is centered over the barrel.
Atop the Amega Mini-Scout-Mount I placed a Simmons 2-6×32 LER Prohunter. While I could have used a nicer piece of glass, the Simmons Prohunter is more than enough scope for this rifle. It used to live on my Ruger Redhawk, but I decided it was a bit too much bulk on top of that revolver. Heck, it’s nearly too big for the 10/22, but until I find a nicer lightweight scope in a bit smaller packaged the Simmons Prohunter will have to do.
The Prohunter LER has 1/2 MOA adjustments for windage and elevation, and their TrueZero™ system keeps you dialed-in. It held true on my hard hitting .44 Magnum revolver, so I’ve no doubt it will perform just as well on the soft-shooting 10/22.
With the scope solidly mounted in place, it was time to head out to the range and see how well this new setup performed. I loaded everything up into the truck, along with some 40 grain Federal American Eagle® Long Rifle cartridges, and drove over to the nearby Elk Castle pistol range.
The furthest distance available at this range is only 25-yards. The .22LR loses speed quickly and the bullet drop increases quickly after 100-yards. That being the case, it really makes sense to zero your rimfire rifles at a 25-yard range. Using that trajectory you’ll have one zero at 25 and another at 50-yards with the bullet rising only 0.2-inches in-between and hitting 1.9-inches low at 75 yards. I find this perfect for squirrel and rabbit hunting.
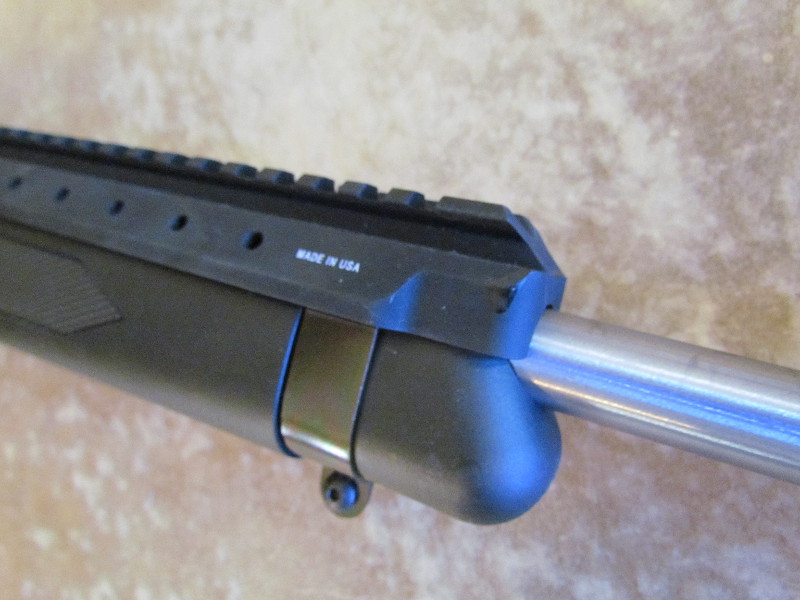
Once installed, the Amega Mini-Scout-Mount makes the rifle look like it came this way from the factory.
As with my earlier trips out there to test out the rifle in factory configuration, and again with just the folding stock, it drew lots of comments from curious shooters and range officers alike. Tricked out in this scout-style configuration there were more than a couple of people interested in duplicating it on their own.
The first few shots were on paper, but naturally it took a bit to walk in the windage. Walking in the elevation proved a little more difficult. I soon found that the elevation on my Simmons was maxed out just about 2 inches high. A little frustrated I took off the scope and reset it, making sure that it was pressed firmly and correctly in place on the rail, and then tightened the mounts back down.
Still the rifle shot about an 1.5-inches high. Since the Prohunter I had was the long eye-relief model it wasn’t a big deal to move it forward or aft on the rail. I eventually found a good spot mounted as far forward as the rail would allow that left my point of impact 0.25-inches high at 25 yards. Good enough for now I suppose.
Given how explicit the instructions were about the order in which the mounting screws are to be torqued, I have to wonder if the rail might not be tweaked just a little. That’s something I’ll have to experiment with later.
In the meantime I’ve got a nice shooting pack rifle that is easily minute-of-squirrel out to 100 yards. With the folding stock and takedown configuration it takes up very little room, and with the scope mounted over the chamber and barrel I don’t have to worry about whether or not it holds zero after being taken down and reassembled every time.
Next time we’ll explore just how well it works hunting squirrels and rabbits out in the woods, among the leaves.
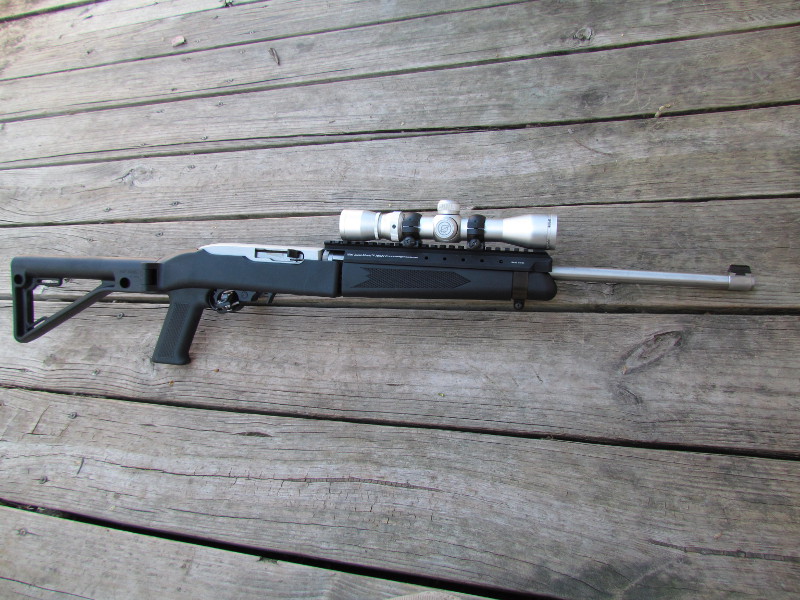
The fully assembled Ruger Takedown 10/22 in scout configuration with folding stock extended.

Is CT a member state of the Union or some tinpot separatist enclave? It’s the former, of course, so the supreme law of the land supersedes any and all seditious edicts.