
Along the shores of Lake Erie in far northwestern Pennsylvania is a little non-profit organization that makes a big difference in the lives of some very sick children.
It all started years ago when, unfortunately, the Make-A-Wish Foundation under intense pressure from anti-gun and anti-hunting groups made the decision to deny any wishes involving firearms.
Back in May of 1996 when a very sick little boy declared that his wish was to hunt bears in Alaska, the Make-A-Wish foundation didn’t bat an eye. They gathered donations from Safari Club International which helped to organize the donation of a rifle, airline tickets, outfitters, and more. When news of the hunt reached animal rights groups, their fury was intense. After a second child wished for and was granted a moose hunt in Alaska later that same month, protests from these groups grew even more vociferous.
The Humane Society, the Alaskan Wildlife Alliance, and Ark Trust, among other groups, brought pressure upon the Make-A-Wish Foundation in the form of letter writing campaigns and protests, and the backlash this created threatened to undermine the charitable donations that enable the Make-A-Wish foundation to fund wishes for thousands of sick and dying children every year.In response to this, the foundation quietly stopped fulfilling wishes that involved hunting, fishing, or firearms. When Tina Pattison’s son Matthew, diagnosed with terminal cancer, was approached by the Make-A-Wish Foundation he declared that it was his wish to hunt moose in Canada. Having been burned by the previous hunting wishes they had fulfilled, the Make-A-Wish Foundation reluctantly declined.
“I had an 18 year old son who wanted to do a hunting wish. He had a rare cancer and he was getting pretty sick.” Tina said, recalling that phone conversation. “I called Make-A-Wish and they told me ‘No more hunts.'”
Matthew’s mother was not that easily dissuaded however. At 18 years old, Matthew was nearly too old to qualify for Make-A-Wish, but cancer is relentless. Faced with few options, Tina picked up the phone and started calling hunting and shooting organizations.
The response was overwhelming.
“The awesome thing about his hunt is that we didn’t to raise any money. Everything was donated. Flight tickets were donated, his tags and license when he got to Alberta was donated, his hotel stay was donated, and they even donated the taxidermy work. We didn’t have to get any money together. We just had to get him together and get him well.”
Matthew got his hunt and was soon up in Canada pursuing the moose of his dreams. Not long after that, Matthew lost his battle with cancer, but the story doesn’t end there.
“My son passed away six months after his hunt. After he passed away we took the donations we got from my fellow school bus drivers and put the $100 down to start.” Tina told us. “From there it got bigger and went nation-wide.”
Matthews dream, and his mother Tina’s persistence, grew into a legacy. Tina Pattison founded Hunt of a Lifetime, a non-profit organization dedicated to providing hunting and fishing adventures to children 21 years old and younger who are terminally ill.
This is far from a one person project anymore. All of the work they do would be impossible without the help of literally hundreds of volunteers. “We have ambassadors in most every state,” she said. “They do outdoor sports shows, contact people who are holding events and set up booths there for us so that we can make the children aware of it.”
The ambassadors do the heavy lifting when it comes to actually organizing the hunts as well.
“If the child, say is from Pennsylvania and wants to go to Arizona for an elk hunt we call the Arizona ambassador and say ‘Hey, I’ve to this number of kids for you this year for bull [elk] hunts,’ and then he calls the family. He looks up the outfitters the kids are going to go out with and puts the hunt all together. Then he gets back to me for their repliki zegarków travel arrangements here at National, as well as any other travel expenses that might come up, and then we send them out.”
Unlike some other charitable organizations where only a fraction of a percent of the money raised goes to support their chosen cause, Hunt of a Lifetime keeps their expenses to a minimum.
All of the money that they raise, “…goes mostly to the kids because the only overhead we have is office supplies and utilities. The office is actually just a one room office, so there are no overhead costs. We don’t have a paid president, vice-president, or treasurer.”
Tina went on to describe their only ongoing costs. “The only three things we have to pay are what the IRS mandates, which are an accountant, auditor, and a lawyer. We do have a part-time secretary that earns part-time minimum wage, but other than that we don’t have a president getting a fancy paycheck. It’s all kept to a minimum so that the money can go where it belongs, which is to the kids.”
Like most charitable organizations, Hunt of a Lifetime is constantly looking for donations and volunteers. They rely upon their ambassadors located in each state to help find deserving children and coordinate guides and outfitters.
“We don’t have much outreach in Washington. Our ambassador there had to resign, so we’re currently looking for somebody to take over Washington.” Tina told us.
“The three states in the middle, Oklahoma, Nebraska and Arkansas, are pretty empty with regards to help. So is Louisiana. We also don’t have a whole lot of anything in Texas. We’re actually looking for someone who wants to be really active in Texas and start helping us in the Texas area.”
Despite all of this, Hunt of a Lifetime remains incredibly active. To date, they’ve given away more than 660 hunts and fishing trips to children suffering from life threatening illnesses in their twelve years of existence. Last year alone they coordinated more than 60 hunts and fishing trips, but their work is ongoing.
Currently Hunt of a Lifetime is looking for landowners and outfitters who can help them put together a caribou hunt and a moose hunt in Canada and Alaska, as well as a bull elk hunt in New Mexico. They are also trying to find a sheep hunt anywhere in the United States.
You can learn more about Hunt of a Lifetime by visiting their website at http://www.huntofalifetime.org and donations can be made online or mailed to P.O. Box 241 Harborcreek, Pa 16421.

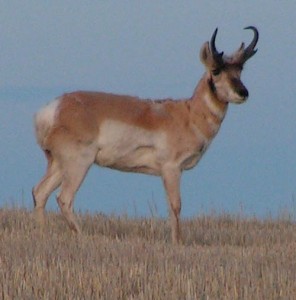 It was almost unbelievable. Here I sat, after stalking a quarter of a mile over the course of an hour, crouched behind a mirror blind less than 40-yards away from a big male pronghorn who was completely at ease and unaware of my presence.


![IMG_0576[1]](https://amongtheleaves.com/wp-content/uploads/2015/09/IMG_05761.jpg)